Master Filming on a Budget: Create Quality Videos in 2025
Learn effective strategies for filming on a budget. Follow our step-by-step guide to create quality videos without breaking the bank.
Master Filming on a Budget: Create Quality Videos in 2025
Creating high-quality videos often sounds like something reserved for big budgets and expensive gear. Yet nearly 86 percent of independent filmmakers use their own equipment or borrow tools instead of buying new ones. Most believe top-notch production comes from the latest cameras and studio lights. What actually matters is knowing how to stretch what you already have and letting creativity outsmart cost every single time.
Table of Contents
- Step 1: Evaluate Your Budget And Resources
- Step 2: Plan Your Video Concept And Script
- Step 3: Select Affordable Equipment And Tools
- Step 4: Scout Cost-Effective Filming Locations
- Step 5: Execute Your Shoot With Strategic Techniques
- Step 6: Review Footage And Edit On A Budget
Quick Summary
| Key Point | Explanation |
|---|---|
| 1. Evaluate budget and resources upfront | Assess your financial constraints and available tools to plan effectively for your video production project. |
| 2. Focus on a clear video concept | Define your video's core message and purpose to guide your shooting and resource allocation effectively. |
| 3. Utilize affordable filming equipment | Use existing devices like smartphones and external microphones to achieve high-quality production without overspending. |
| 4. Scout low-cost filming locations | Look for free or low-cost sites like parks and community spaces to enhance visual appeal without incurring extra fees. |
| 5. Plan and execute with precision | Create a detailed shooting schedule for efficiency, and maintain flexibility to adapt to unexpected challenges during filming. |
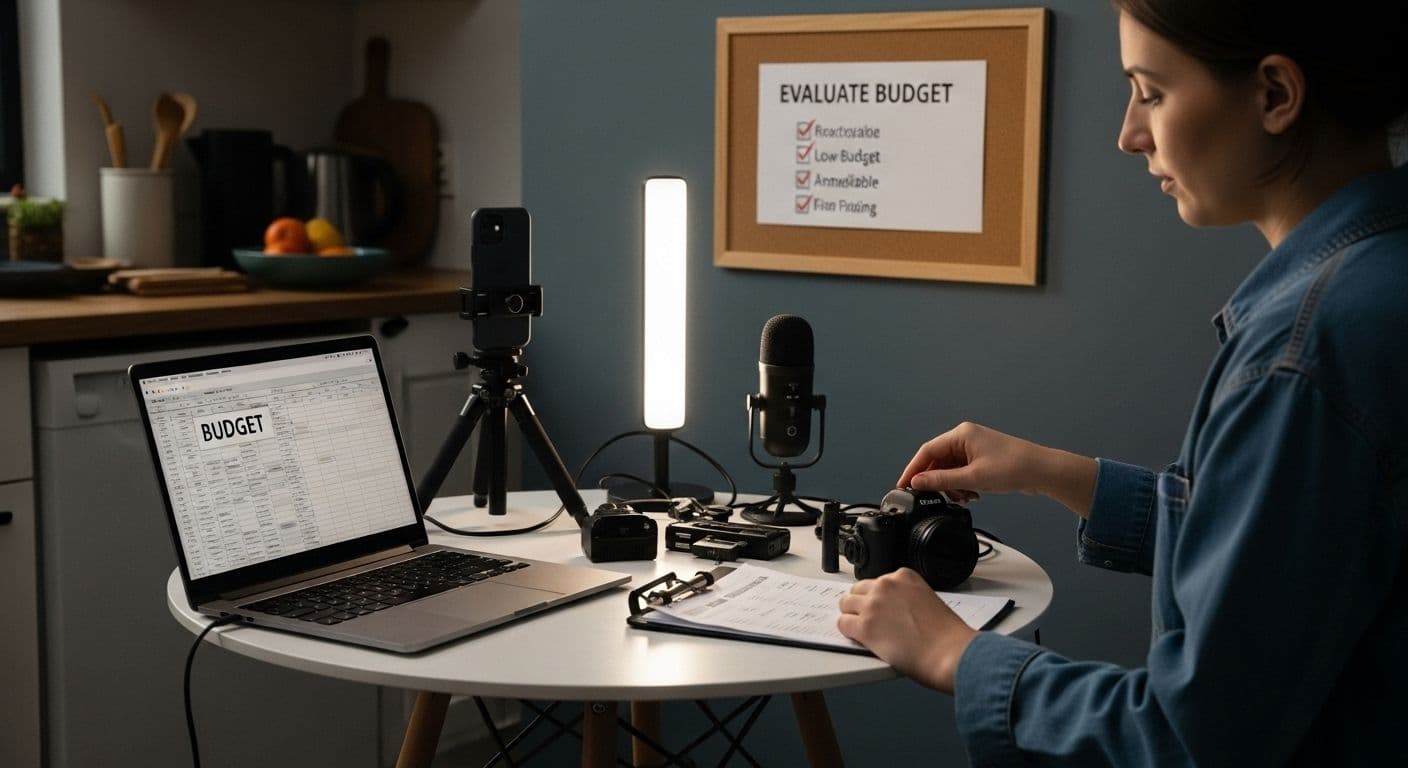
Step 1: Evaluate Your Budget and Resources
Filming on a budget requires strategic planning and a clear understanding of your financial constraints and available resources. Before diving into your video production, you need to conduct a comprehensive assessment that will serve as the foundation for your entire project. This initial evaluation determines not just what you can afford, but how creatively you can leverage your existing tools and skills.
Start by performing a detailed inventory of your current equipment. Take stock of everything you already own that could potentially contribute to your filming process. This includes cameras, microphones, lighting equipment, tripods, and even smartphones with high-quality video capabilities. Do not assume you need brand new professional gear to create compelling content. Many successful independent filmmakers have produced remarkable videos using minimal equipment.
According to research from the International Documentary Association, understanding the relationship between your story concept, schedule, and budget is crucial. This means your budget evaluation should align closely with your creative vision. Determine the specific requirements of your project and map out potential expenses. Create a realistic spreadsheet that breaks down anticipated costs into clear categories:
- Equipment rental or purchase
- Location fees
- Talent or actor compensation
- Post-production editing expenses
- Additional software or digital tools
- Miscellaneous production costs
While calculating your budget, be honest about your financial limitations. If professional equipment seems out of reach, consider alternative strategies like renting gear for specific shooting days, collaborating with other creators who might share resources, or exploring cost-effective digital platforms that offer affordable production solutions. Your creativity matters far more than the price tag of your equipment.
Finally, validate your budget assessment by cross-referencing your estimated expenses with your available funds. Be prepared to make strategic compromises and remain flexible. A well-planned budget doesn't mean restricting your creativity but channeling your resources most effectively.
 Your goal is to produce high-quality content that communicates your message powerfully, regardless of financial constraints.
Step 2: Plan Your Video Concept and Script
Successful filming on a budget hinges on meticulous concept development and scriptwriting. This critical stage transforms your creative vision into a structured blueprint that will guide your entire production process. The more precisely you define your video's purpose and narrative, the more efficiently you can allocate your limited resources.
Begin by crystallizing the core message of your video. What story do you want to tell? What specific outcome are you seeking? Whether you are creating a marketing video, documentary, tutorial, or creative narrative, your concept must be laser-focused and compelling. Spend time brainstorming and refining your central idea, eliminating unnecessary complexity that could inflate production costs.
According to research from the University of Nebraska-Lincoln, robust pre-production planning minimizes costly production errors and reshoots. Draft a preliminary script that outlines your narrative structure, key scenes, dialogue, and visual requirements. This document serves as your production roadmap, helping you anticipate potential challenges and streamline your shooting schedule.
Practical script development requires strategic thinking. Break down your script into manageable segments, considering:
- Scene complexity
- Required locations
- Number of actors or participants
- Specific visual or audio elements
- Potential production challenges
Consider utilizing free or low-cost scriptwriting tools that can help organize your narrative. Applications like Celtx or WriterDuet offer basic free versions that can help structure your script professionally without significant financial investment.
During script development, remain flexible and pragmatic. Your initial concept may need adjustments based on your budget and available resources. Look for creative solutions that maintain your core message while simplifying production requirements. This might mean reducing location changes, minimizing special effects, or reimagining scenes to be more production-friendly.
Finally, review your script critically. Read it aloud, time the potential scenes, and ensure every element serves your core narrative. A concise, well-structured script is your most powerful tool for creating a high-quality video on a limited budget. The more clarity and precision you bring to this stage, the smoother and more cost-effective your production will become.
Step 3: Select Affordable Equipment and Tools
Selecting the right equipment for filming on a budget requires strategic thinking and creativity. Your goal is to maximize production quality while minimizing financial investment. Modern technology has dramatically democratized video production, making it possible to create professional-looking content without breaking the bank.
Start by understanding that your smartphone can be a powerful primary filming tool. Recent smartphone models offer 4K video recording, advanced image stabilization, and professional-grade camera sensors. Before investing in expensive camera equipment, thoroughly test your existing devices. Many successful content creators have built entire careers using nothing more than a high-quality smartphone and basic accessories.
According to research from the National Center for Biotechnology Information, high-quality video production is achievable through strategic equipment selection. Your essential budget-friendly toolkit should include:
- Smartphone or affordable digital camera
- Tripod with smartphone mount
- External microphone
- Basic LED lighting panels
- Portable reflector
Audio quality often matters more than visual perfection. Invest in an affordable external microphone that can dramatically improve sound recording. Lavalier microphones that connect directly to smartphones provide professional sound capture at a fraction of professional equipment costs. Brands like Rode offer budget-friendly options that significantly enhance audio quality.
Lighting represents another crucial yet often overlooked aspect of budget filmmaking. Natural light is your most cost-effective resource. Learn to position your filming area near windows or in well-lit spaces. When additional lighting becomes necessary, consider affordable LED panel lights which provide consistent illumination without expensive studio setups. Portable reflector panels can help manipulate existing light, creating professional-looking results with minimal investment.
Remember that accessories can transform basic equipment. A stable tripod eliminates shaky footage, while simple smartphone gimbals can provide smooth tracking shots. Look for multipurpose tools that offer maximum flexibility. Creativity trumps expensive gear every time. Focus on understanding your equipment's capabilities and learning techniques to maximize its potential. Practice, experiment, and continuously refine your technical skills to produce compelling videos that transcend equipment limitations.
Step 4: Scout Cost-Effective Filming Locations
Location scouting represents a critical phase in budget-conscious filmmaking where creativity can significantly reduce production expenses. Your filming location can make or break both your budget and the overall quality of your video. Understanding how to identify and leverage affordable, visually compelling spaces is an essential skill for independent creators.
Start by exploring locations that are free or require minimal permitting. Public spaces like parks, community centers, university campuses, and your own personal spaces can provide stunning backdrops without substantial financial investment. Consider the visual aesthetics, lighting conditions, and acoustic properties of potential locations. Natural settings often offer breathtaking cinematography without the costs associated with studio rentals.
According to research from the University of Wisconsin--Stout, strategic location selection can have broader economic implications. Some smaller communities actively welcome film productions, potentially offering free or discounted location access in exchange for potential tourism exposure. Reach out to local tourism boards or municipal offices to explore collaboration opportunities.
Your location scouting toolkit should include:
- High-resolution smartphone camera
- Measuring tape
- Location release forms
- Natural lighting assessment tool
- Portable sound recording device
Technology can dramatically simplify your location scouting process. Use mapping applications and virtual exploration tools to pre-scout locations remotely. Google Street View, for instance, allows you to virtually walk through potential filming sites, saving time and transportation costs. When you find promising locations, schedule in-person visits during times that match your intended filming conditions.
Consider the practical logistics beyond visual appeal. Evaluate accessibility for your crew and equipment, parking availability, electrical outlets, and potential sound interference. A beautiful location becomes problematic if it creates unnecessary production challenges. Negotiate location access professionally. Many property owners are willing to provide filming rights in exchange for proper communication, potential credit in your production, or a small courtesy fee.
Finally, always secure proper permissions. Obtain written location releases to prevent potential legal complications. Even when filming in seemingly public spaces, certain areas require specific permits. Your goal is to balance creative vision with practical, budget-conscious decision-making that ensures a smooth, cost-effective production experience.

Step 5: Execute Your Shoot with Strategic Techniques
Executing a budget-friendly video shoot requires a combination of meticulous planning and creative problem-solving. Your ability to adapt and optimize resources will determine the success of your production. Approach your shooting day with a military-like precision while maintaining flexibility for unexpected challenges.
Begin by creating a detailed shooting schedule that maximizes efficiency. Group similar scenes together to minimize location transitions and reduce setup time. This approach conserves energy, saves time, and helps control production costs. Prepare all equipment the night before, checking batteries, memory cards, and audio recording devices. Unexpected technical failures can derail an entire shooting day, so redundancy is key.
According to research from the University of Gloucestershore, networking and collaboration are crucial in micro-budget filmmaking. If possible, recruit friends, fellow creators, or film students who can serve as crew members. Trade skills and favors instead of monetary compensation. Someone might offer camera operation in exchange for future assistance on their project.
Your strategic shooting toolkit should include:
- Extra batteries and charging devices
- Backup memory cards
- Portable light reflector
- Gaffer tape
- Basic repair kit
Lighting and sound quality matter more than expensive equipment. Learn to manipulate natural light by shooting during golden hours near sunrise and sunset. These times provide soft, flattering illumination without additional lighting equipment. Position subjects near windows or use simple reflective surfaces to enhance existing light. For audio, record in quiet environments and use external microphones to capture clear sound.
During shooting, maintain a positive and efficient atmosphere. Clear communication prevents misunderstandings and reduces time-consuming reshoots. Give concise instructions, provide constructive feedback, and keep the energy focused. Take regular short breaks to maintain crew morale and prevent fatigue. A 10-minute break can restore creativity and prevent costly mistakes.
Finally, document everything meticulously. Take detailed notes about each shot, lighting conditions, and potential challenges. These notes will prove invaluable during post-production editing. Remember that strategic filming is about working smarter, not harder. Your creativity and resourcefulness are your most powerful tools in creating high-quality content on a limited budget.
Below is a checklist table summarizing important tasks to complete before, during, and after your budget-friendly video shoot.
| Task | Purpose | When to Complete |
|---|---|---|
| Inventory current equipment | Know what gear you already have | Pre-production |
| Draft and review script | Ensure narrative clarity and structure | Pre-production |
| Secure filming locations and permits | Avoid legal issues and last-minute changes | Pre-production |
| Prepare all gear and accessories | Prevent technical failures on shoot day | Night before filming |
| Follow a detailed shooting schedule | Maximize efficiency and reduce costs | Filming |
| Organize and review footage | Identify best takes for editing | After filming |
| Edit using free or low-cost software | Create a polished final product | Post-production |
| Export and test final video | Ensure accessibility and quality | Post-production |
Step 6: Review Footage and Edit On a Budget
Editing transforms raw footage into a compelling narrative, and contrary to popular belief, you can achieve professional results without expensive software. Your editing process is where storytelling truly comes alive, turning disconnected shots into a cohesive visual experience. The key is understanding that creativity matters more than costly tools.
Begin by thoroughly reviewing all captured footage. Create a systematic approach to organize your video files, using clear naming conventions and folders. Import your footage into a free editing platform like Shotcut, which offers robust editing capabilities without financial investment. Watch each clip multiple times, taking notes on the most powerful moments, unique angles, and segments that best communicate your story.
According to research from Filmora's editing resources, strategic editing involves more than technical skills. Focus on maintaining narrative flow, eliminating redundant footage, and creating smooth transitions. Your goal is to tell a compelling story efficiently. Practice basic editing techniques like cutting between shots, adjusting clip lengths, and using simple transitions that don't distract from your core message.
Your budget editing toolkit should include:
- Free video editing software
- External hard drive for storage
- Noise-canceling headphones
- Calibrated monitor
- Color correction preset library
Audio quality can dramatically improve your video's professionalism. Use free audio editing tools to clean background noise, adjust volume levels, and synchronize sound. Many creators underestimate audio's importance, but clear sound dramatically enhances viewer engagement. Experiment with royalty-free music and sound effects from websites like Free Sound to add production value without additional costs.
Color grading represents another powerful technique for elevating your video's visual appeal. Most free editing software includes basic color correction tools. Learn to adjust exposure, contrast, and saturation to create a consistent visual style. Watch online tutorials that demonstrate color grading techniques specific to your chosen editing platform.
Finally, export your video in multiple formats and resolutions. Test your final product on different devices to ensure quality and accessibility. Remember that great editing is about storytelling, not expensive equipment. Your creativity, patience, and willingness to learn will ultimately determine your video's impact.
Ready to Create Stunning Videos Without Breaking the Bank?
Struggling to film quality videos on a tight budget can feel overwhelming. The article shows how unpredictable costs and limited access to gear and locations often stop creators from bringing their visions to life. You worked hard to plan, script, and organize your video—but even the best preparation can leave you facing barriers like technical gaps, complicated editing, and lack of time. Imagine if you could skip the hardest parts and let smart technology handle the heavy lifting for you.
Take the next step and let Palmedor.ai turn your creative concepts into professional videos with less stress and cost. Our AI-driven platform generates scripts, manages scenes, and handles editing with just a simple prompt or image upload. No need for expensive equipment or complex learning curves—just your idea and our intuitive tools. Try our easy-to-use features for making brand films, social clips, or narrative content. Explore more at our landing page and see how quickly you can produce the videos you imagined. Get started today and unlock high-quality results in record time.
Frequently Asked Questions
How can I film a quality video on a budget?
To film a quality video on a budget, evaluate your available resources and equipment, plan your video concept carefully, and select affordable tools and locations. Consider using smartphones for filming, collaborating with others, and utilizing free editing software to maximize quality while keeping costs down.
What types of equipment are most important for low-budget filming?
For low-budget filming, prioritize essential equipment such as a smartphone or affordable digital camera, a tripod, an external microphone for better audio, and basic lighting tools like LED panels. These items will significantly enhance your production quality without requiring a large investment.
What strategies can I use to find cost-effective filming locations?
To find cost-effective filming locations, explore public spaces such as parks, community centers, and personal properties. Research local tourism boards that may offer free access to filming locations in exchange for exposure or credits. Always secure proper permissions to avoid legal complications.
How can I effectively edit video footage on a tight budget?
You can edit video footage effectively on a tight budget by using free editing software like Shotcut. Focus on organizing your footage, maintaining narrative flow, and utilizing royalty-free music and sound effects. Basic audio cleaning and color correction techniques can also enhance your final video quality without extra costs.