Create DIY Filmmaking Equipment for Quality Video Production
Step-by-step guide to building DIY filmmaking equipment for high-quality video production. Perfect for creators looking to save costs.
Create DIY Filmmaking Equipment for Quality Video Production
Building your own DIY filmmaking setup might sound expensive or complicated, especially for newcomers. Here is something unexpected. Research from the University of Florida highlights that many filmmakers already own high-definition video equipment without even realizing it, thanks to the power of modern smartphones. So while professional gear looks fancy, your creative journey often starts with what is already in your pocket. Curious how far you can take it? The answers will surprise you.
Table of Contents
- Step 1: Identify Your Filmmaking Needs And Budget
- Step 2: Research Essential DIY Equipment Components
- Step 3: Gather Required Materials And Tools
- Step 4: Construct Your Filmmaking Equipment
- Step 5: Test Your Equipment For Functionality
- Step 6: Fine-Tune And Optimize Your Setup
Quick Summary
| Key Point | Explanation |
|---|---|
| 1. Identify your filmmaking goals | Understand the type of content you want to create to inform your equipment choices and budget. |
| 2. Research essential equipment thoroughly | Investigate the different equipment categories to ensure you choose components that fit your production needs. |
| 3. Gather materials systematically | Create an organized inventory of required tools, ensuring functionality and compatibility before purchasing. |
| 4. Test equipment under real conditions | Assess each component's performance in a mock filming environment to identify potential issues accurately. |
| 5. Fine-tune your setup for optimization | Adjust lighting, audio, and camera settings deliberately to enhance production quality for your specific project. |
Step 1: Identify Your Filmmaking Needs and Budget
Successful DIY filmmaking starts with a clear understanding of your project requirements and financial limitations. Before investing in any equipment, take a strategic approach to planning your video production. Your initial goal is to match your equipment choices with your specific creative vision and budget constraints.
Begin by thoroughly examining the type of video content you want to create. Are you producing a short documentary, a marketing video, a narrative film, or social media content? Each genre demands different technical specifications and equipment capabilities. For instance, a cinematic short film might require more sophisticated camera gear compared to a quick tutorial video for social media.
Carefully assess your current resources and skill level. Many aspiring filmmakers already own smartphones capable of recording high-definition video. According to University of Florida's video production guide, the key is to understand how to maximize your existing equipment before making significant purchases. Consider creating a detailed project outline that specifies the following equipment categories:
- Camera/recording device
- Audio capture tools
- Lighting equipment
- Stabilization accessories
- Post production resources
Determine your budget realistically by researching equipment prices and comparing rental versus purchase options. Professional-grade equipment can be expensive, but numerous affordable alternatives exist for DIY filmmakers. Allocate your budget strategically, prioritizing essential items that directly impact video quality. For audio and visual components, invest in tools that provide the most significant improvement to your production value.
Remember that technical specifications are important, but creativity and storytelling remain paramount. A well-composed shot using modest equipment often surpasses a technically perfect video lacking narrative depth. Your primary objective is selecting gear that empowers your creative vision while remaining financially responsible.
Step 2: Research Essential DIY Equipment Components
Researching equipment is a critical phase in building your DIY filmmaking toolkit. This step transforms your conceptual vision into a practical production plan by identifying the specific components that will elevate your video quality without breaking the bank.
Start by understanding the fundamental equipment categories essential for quality video production. Camera systems represent your primary visual capture tool, ranging from professional DSLRs to high-end smartphone setups. While professional cameras offer superior technical capabilities, modern smartphones can produce remarkable footage when paired with the right accessories.
Audio equipment demands equal attention. According to University of Delaware's multimedia production guide, sound quality often matters more than visual perfection. Investigate external microphones like lavaliere mics for clear dialogue, shotgun mics for directional sound capture, and portable audio recorders that provide professional-grade recording capabilities.
Lighting equipment represents another crucial research area. Three-point lighting remains the standard professional technique, involving key light, fill light, and backlight. For DIY filmmakers, this translates to exploring affordable LED panels, ring lights, softboxes, and reflectors that can dramatically improve your visual aesthetics. Budget-conscious creators can even construct homemade lighting solutions using household items and strategic positioning.
Key equipment research priorities include:
- Compatibility between different components
- Versatility across multiple shooting scenarios
- Cost-effectiveness and potential long-term usage
- Ease of transport and setup
Compare multiple sources of information during your research, including professional review websites, filmmaker forums, and YouTube tutorials showcasing real-world equipment performance. Watch demonstration videos that show actual footage captured using specific gear, paying close attention to audio clarity, color reproduction, and low-light performance.
Remember that research is an ongoing process. Technology evolves rapidly, so bookmark reliable resources and subscribe to channels that provide up-to-date equipment insights. Your goal is building a flexible, adaptable toolkit that supports your creative vision while remaining financially responsible.
Step 3: Gather Required Materials and Tools
The process of gathering materials transforms your filmmaking vision from concept to tangible reality. This critical step requires methodical organization and strategic procurement of equipment that aligns with your project's specific requirements. Your goal is to assemble a comprehensive toolkit that maximizes creative potential while maintaining budget constraints.
Primary equipment selection demands careful consideration of each component's functionality and compatibility. Start by creating a detailed inventory of the tools you've identified during your research phase. This might include your primary recording device, whether a smartphone, DSLR camera, or dedicated video camera, along with complementary accessories like tripods, external microphones, and lighting equipment.
According to Columbia University's Center for Teaching and Learning, essential hardware extends beyond cameras and microphones. Consider supplementing your kit with additional tools that enhance production quality:
- Reliable computer or laptop for editing
- External hard drives for storage
- Headphones for audio monitoring
- Spare batteries and charging equipment
- Adaptable mounting systems
When sourcing your equipment, explore multiple purchasing strategies. Online marketplaces offer competitive pricing, while local photography and electronics stores provide opportunities to physically inspect gear. Consider both new and pre-owned equipment, understanding that quality used items can significantly reduce initial investment costs.
Pay special attention to interconnectivity and compatibility. Ensure your selected components work seamlessly together, checking connector types, power requirements, and software integration. Invest in universal adapters and cables that provide flexibility across different devices. Budget-conscious filmmakers should prioritize versatile tools that can serve multiple functions across various shooting scenarios.
Finalize your material gathering by creating a comprehensive equipment checklist. Organize your tools systematically, creating dedicated storage solutions that protect your investment and ensure quick access during production. A well-organized toolkit represents the foundation of successful DIY filmmaking, transforming creative vision into professional-quality visual storytelling.
Below is a table summarizing the essential DIY filmmaking equipment categories along with their typical function and example options, to help guide your material gathering and organization.
| Equipment Category | Typical Function | Example Options |
|---|---|---|
| Camera/Recording Device | Captures video footage | Smartphone, DSLR, Video Camera |
| Audio Capture Tools | Records clear sound | External microphone, Audio recorder |
| Lighting Equipment | Illuminates subjects/scenes | LED panels, Ring lights, DIY softbox |
| Stabilization Accessories | Reduces camera shake | Tripod, Homemade rig, Handheld stabilizer |
| Post Production Resources | Allows editing and final touches | Computer, Editing software |
| Storage Solutions | Backs up recordings and footage | External hard drive, SD cards |
| Power/Battery Supplies | Ensures continuous operation | Spare batteries, Power bank |
![]()
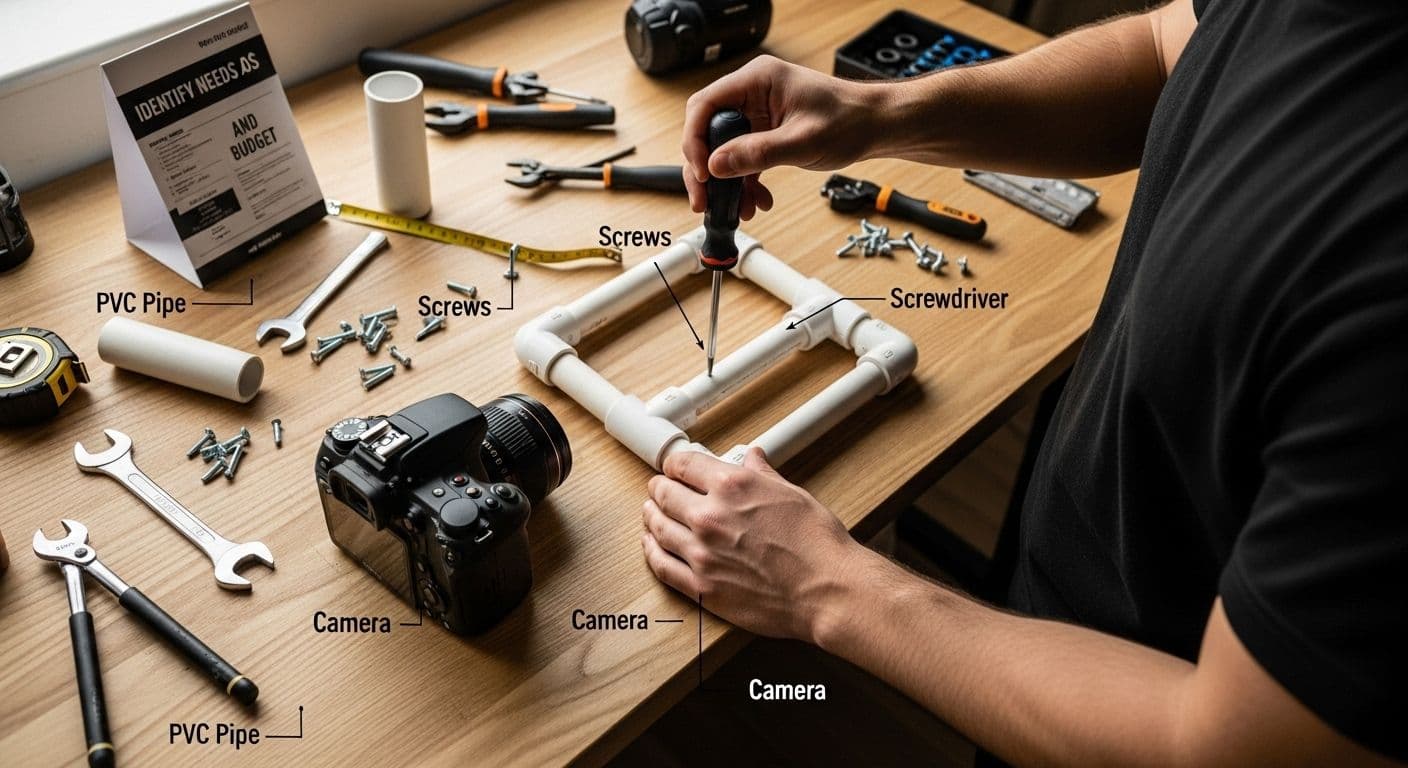
Step 4: Construct Your Filmmaking Equipment
Constructing your DIY filmmaking equipment transforms theoretical planning into practical reality. This step requires creativity, technical understanding, and a willingness to experiment with unconventional solutions that can dramatically improve your video production capabilities.
Stabilization tools represent an excellent starting point for equipment construction. Professional tripods can be expensive, but resourceful filmmakers can create stable mounting systems using everyday materials. Consider crafting a smartphone stabilizer using PVC pipes, wooden dowels, or even repurposed bicycle handlebars. The key is creating a balanced, lightweight structure that minimizes camera shake and provides smooth movement.
According to Spy Hop's DIY Film Gear Workshop, homemade equipment can be surprisingly effective when constructed with precision. Lighting solutions offer another opportunity for creative DIY engineering. Develop custom lighting rigs using affordable LED strips, aluminum framing, and diffusion materials like white fabric or translucent plastic sheets. These homemade lighting setups can provide professional-grade illumination at a fraction of commercial equipment costs.
Audio capture requires specialized attention. Construct basic sound absorption panels using wooden frames, acoustic foam, and fabric to improve recording environments. Microphone shock mounts can be fabricated using rubber bands, wire, and small metal rings, reducing unwanted vibration and improving sound quality.
Key construction considerations include:
- Durability and structural integrity
- Lightweight and portable design
- Adaptability across different shooting scenarios
- Minimal financial investment
- Easy maintenance and repair
Safety remains paramount during equipment construction. Use appropriate protective gear like safety glasses when cutting materials, and ensure all connections are secure. Test each homemade component thoroughly before actual production, simulating potential stress and movement scenarios.
Document your construction process through photographs and notes. This documentation serves multiple purposes: tracking your creative problem-solving, providing a reference for future improvements, and potentially sharing your innovative solutions with other DIY filmmakers. Remember that each piece of custom equipment represents a unique extension of your creative vision, transforming practical limitations into opportunities for inventive storytelling.
Step 5: Test Your Equipment for Functionality
Testing your DIY filmmaking equipment is a critical phase that bridges equipment preparation and actual production. This comprehensive evaluation ensures that your carefully assembled toolkit performs consistently and meets the technical requirements of your creative vision.
Systematic testing begins with individual component assessment. Start by examining each piece of equipment separately, verifying basic functionality like power connections, cable integrity, and mechanical movement. For cameras, test zoom capabilities, focus mechanisms, and image stabilization. Lighting equipment should demonstrate consistent color temperature and brightness across different settings.
According to Vanderbilt University's Center for Teaching, comprehensive equipment testing requires simulating actual recording conditions. Create a mock filming environment that closely resembles your intended shooting location. This approach helps identify potential challenges such as ambient noise, lighting inconsistencies, and unexpected equipment limitations.
Audio testing demands meticulous attention. Record sample audio in various environments to evaluate microphone performance, checking for clarity, background noise, and potential interference. Pay special attention to sound quality by using headphones during recording to catch subtle audio imperfections that might not be immediately apparent.
Key testing considerations include:
- Battery life and power management
- Thermal performance under extended use
- Compatibility between different equipment components
- Recording quality across multiple settings
- Durability and stress resistance
Document your testing process thoroughly. Create a detailed log recording each equipment's performance, noting strengths, weaknesses, and potential modifications. Take sample footage and audio recordings that can be reviewed later, allowing for critical assessment and potential adjustments.
Remember that testing is an iterative process. Expect and embrace imperfections as opportunities for improvement. Each test reveals valuable insights about your equipment's capabilities and limitations. Approach this stage with patience and a problem-solving mindset, understanding that refinement is an integral part of DIY filmmaking. Your goal is to develop a reliable, adaptable toolkit that consistently delivers professional-quality results.
The following table provides a concise overview of each main step in the DIY filmmaking equipment process, along with key actions and expected outcomes, to support quick reference and effective planning.
| Step | Key Actions | Expected Outcome |
|---|---|---|
| Identify Needs and Budget | Assess goals, project type, set spending limits | Targeted, budget-conscious planning |
| Research Equipment Components | Compare device types, check compatibility | Informed purchasing decisions |
| Gather Materials and Tools | Create inventory, source compatible items | Equipped and organized toolkit |
| Construct Filmmaking Equipment | Build DIY gear, ensure safety and durability | Custom, cost-effective solutions |
| Test Equipment for Functionality | Simulate shoots, monitor performance | Reliable, functional setup |
| Fine-tune and Optimize Setup | Adjust lights, sound, and camera settings | Enhanced production quality |
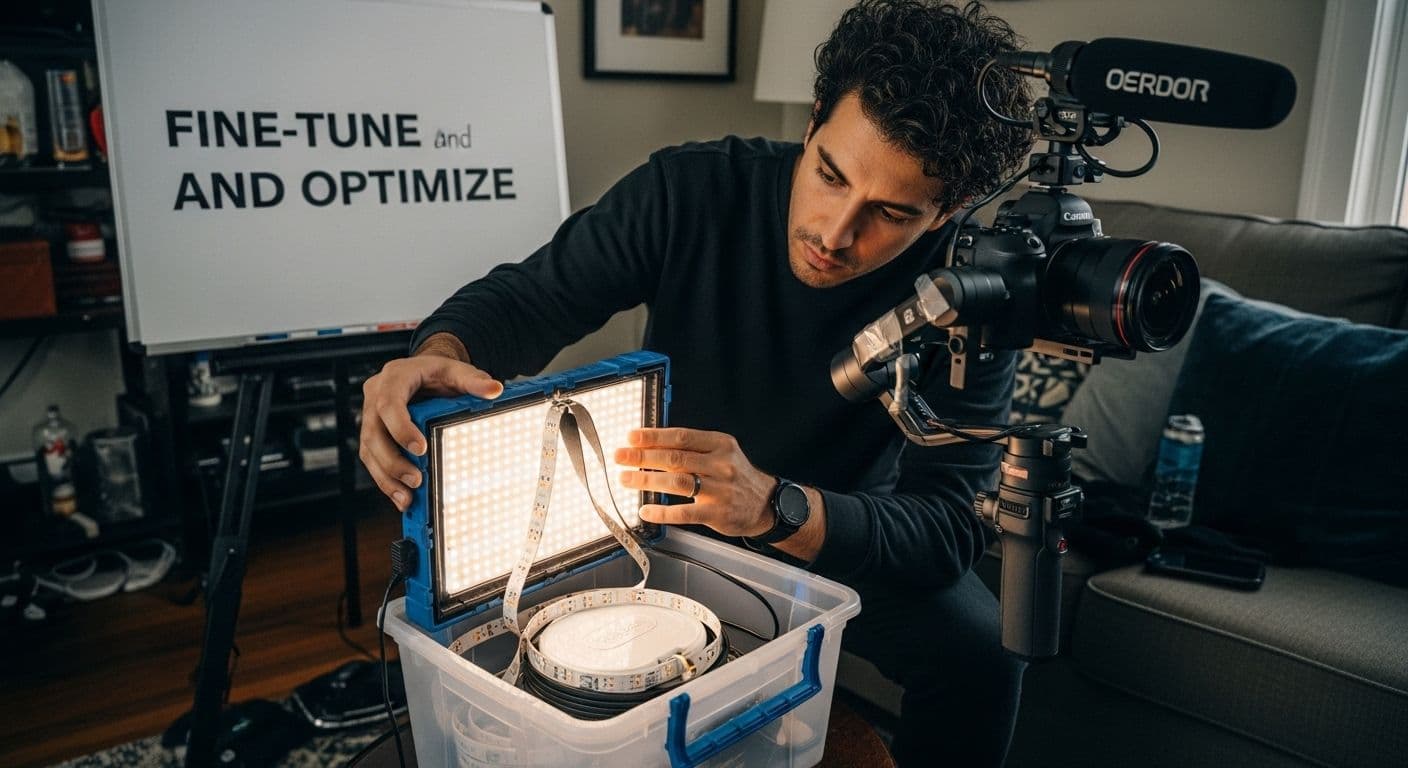
Step 6: Fine-tune and Optimize Your Setup
Fine-tuning your DIY filmmaking equipment transforms a basic setup into a professional-grade production system. This critical optimization phase focuses on maximizing your equipment's performance through strategic adjustments and thoughtful configuration.
Lighting configuration represents the most impactful area for optimization. Experiment with different light placement angles, understanding that subtle shifts can dramatically transform visual quality. Position your primary light source approximately 45 degrees above and to the side of your subject, creating depth and minimizing harsh shadows. Utilize diffusion materials like white fabric or professional light gels to soften harsh light and create more natural illumination.
According to research on video production techniques, sound optimization is equally crucial. Implement basic soundproofing techniques by identifying and eliminating potential audio interference sources. Hang soft materials like heavy curtains or acoustic panels to reduce echo and external noise. Test your audio recording in multiple locations, adjusting microphone placement to capture the cleanest possible sound.
Camera and stabilization systems require meticulous calibration. Make incremental adjustments to your tripod or homemade stabilization rig, ensuring smooth panning and minimal vibration. Calibrate your camera's settings by experimenting with different frame rates, exposure levels, and white balance configurations that complement your specific shooting environment.
Key optimization strategies include:
- Systematic incremental adjustments
- Comprehensive performance documentation
- Cross-component compatibility testing
- Repeated real-world simulation scenarios
- Continuous learning and adaptation
Develop a comprehensive optimization log documenting each adjustment's impact on overall production quality. Photograph your final setup, noting specific equipment positions, angles, and settings. This documentation serves as a valuable reference for future productions and helps you replicate successful configurations.
Embrace an experimental mindset throughout the optimization process. Understand that perfection emerges through patient, iterative refinement. Each small adjustment brings you closer to creating a DIY filmmaking toolkit that delivers professional-quality results while reflecting your unique creative vision.
Ready to Go Beyond DIY? Unlock Seamless High-Quality Filmmaking
Every DIY filmmaker knows the struggle of balancing creative ambition with technical barriers. After countless hours spent gathering materials, building makeshift gear, and testing homemade setups, it is frustrating when footage still falls short of cinematic quality. If you are seeking a way to bring your storytelling vision to life without the technical roadblocks or endless tinkering, there is a solution designed for you.
Step up your video production with Palmedor.ai, the AI-powered platform built to deliver stunning professional results from just your ideas or images. Skip the stress of equipment hacks and gear optimization. Instead, let intuitive AI handle scriptwriting, scene creation, editing, and even output customization tailored for every channel. Discover how you can start transforming concepts into cinematic videos today by visiting Palmedor.ai. Do not settle for DIY limitations when your next brand film, social video, or creative project can be just a prompt away. Try now and experience a more powerful way to create your vision.
Frequently Asked Questions
What type of camera should I use for DIY filmmaking?
For DIY filmmaking, you can use a range of cameras from professional DSLRs to high-end smartphones. The key is to choose a camera that fits your project requirements and offers the capability to capture high-quality video.
How can I improve audio quality in my DIY films?
To enhance audio quality, invest in external microphones that suit your needs, such as lavalier mics for dialogue or shotgun mics for directional sound capture. Additionally, consider implementing basic soundproofing techniques in your recording environment.
What are some budget-friendly lighting options for DIY filmmaking?
Affordable lighting options include LED panels, ring lights, and softboxes. You can also create homemade lighting solutions using household items like white bedsheets to diffuse light or aluminum foil as reflectors to improve your visual aesthetics.
How can I create stabilization for my camera?
For stabilization, you can build a DIY rig using materials like PVC pipes or wooden dowels. You can also use tripods or handheld stabilizers that reduce camera shake, ensuring smoother video footage.